How to create a bootable Linux USB drive

How to create a bootable Linux USB drive

How to create a bootable Linux USB drive

Here’s How to create a bootable Linux USB drive

How to create a bootable Linux USB drive – Before immersing yourself in the world of the user-friendly, flexible, secure, and reliable Linux operating system, there’s a crucial step to tackle: the installation process.

Fortunately, modern Linux installers have streamlined the process, making it incredibly straightforward. With just a few clicks, you’ll be well on your way to installing Linux and preparing to explore its myriad features. In fact, if you’re capable of installing any software, you possess the skills needed to install Linux.

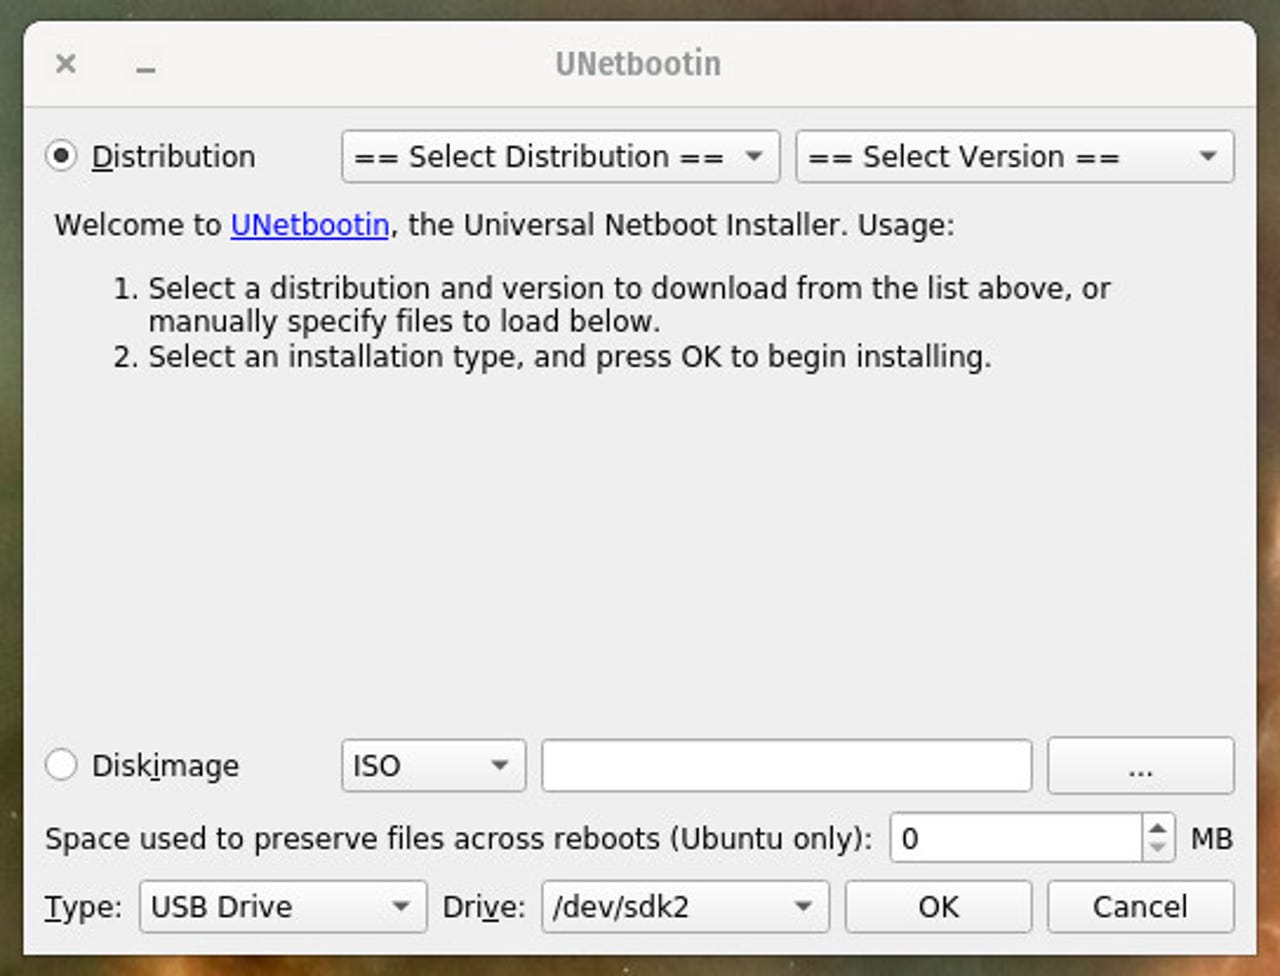
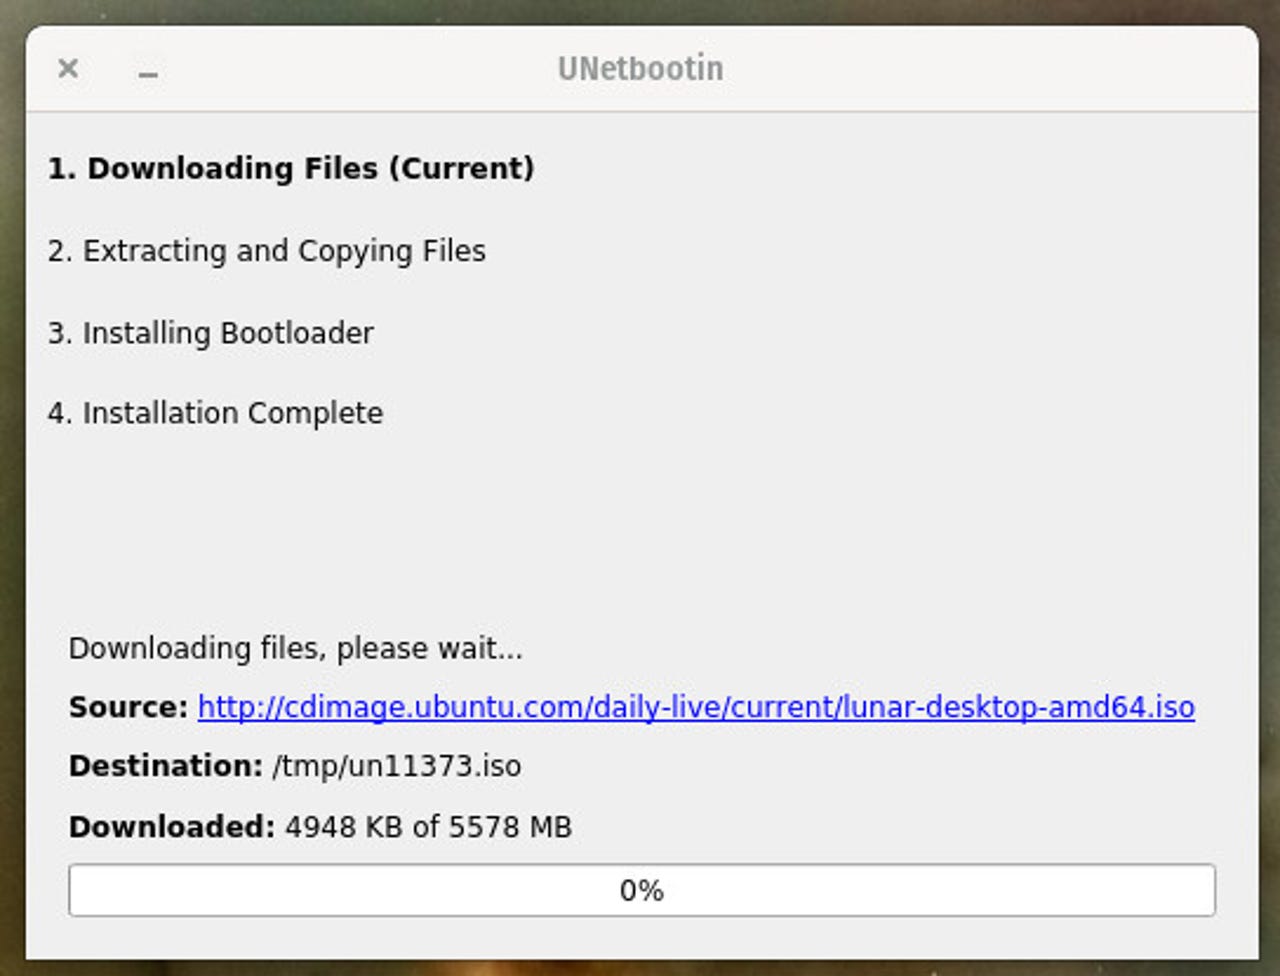
The gateway to accessing this open-source world lies in creating a bootable USB drive, enabling you to install the OS on your computer seamlessly.

But fear not, even this initial step is a breeze. Allow me to guide you through the process.

Creating your bootable USB drive is a straightforward process. Here’s what you’ll need:

  1. An ISO image of the distribution you want to use.
  2. A machine with a USB port.
  3. A USB flash drive with a capacity of at least 16GB.
  4. A software tool to create the bootable drive.

There are numerous tools available for creating bootable USB drives, including Ventoy, Rufus, Etcher, dd, Fedora Media Writer, Popsicle, and more. For the purpose of this guide, we’ll use UNetbootin, which is available on all major computing platforms: Linux, MacOS, and Windows.

To get started, you can easily install UNetbootin by downloading the executable file to your desktop and running it. The installation process is similar to most applications on both MacOS and Windows. Once installed, you’re ready to begin creating your bootable USB drive.

See also  First Look at Samsung Galaxy S24 FE Design

SEE ALSO: Galaxy AI is now available for other Samsung phones

To create a bootable drive, follow these steps:

  1. Download one of the ISO images from the following distributions: Ubuntu Budgie, Ubuntu, elementary OS, Zorin OS, or Fedora.
  2. Insert your USB drive into the computer where you installed UNetbootin. Ensure the system recognizes the drive and take note of its name.
  3. Launch the UNetbootin application from your computer’s desktop menu.
  4. Once UNetbootin is open, you have two options: either use the ISO image you downloaded or select from a pre-configured list of distributions within the UNetbootin window.
  5. If you opt for a pre-configured distribution, ensure you select the most recent version from the dropdown menu labeled “Select Version” in the upper right corner of the UNetbootin window.
The UNetbootin main window.
Creating a bootable USB drive with UNetbootin is very easy. Screenshot by Jack Wallen/ZDNET
  1. Select your USB drive: Ensure “USB Drive” is selected in the Type dropdown menu, then choose the name of your USB drive from the Drive dropdown. Exercise caution in selecting the correct drive, as UNetbootin will erase all data on the chosen drive. To minimize the risk of error, it’s advisable to remove all external drives except the one intended for use as your bootable drive.
  2. Burn the image: Click OK to initiate the process. UNetbootin will commence by downloading the necessary ISO (if you opted for a pre-configured image), followed by the extraction and copying of files, installation of the bootloader, and finalization of the process.

Depending on factors such as the need to download a distribution and the speed of your network and computer, the entire process typically lasts between five to 15 minutes.

See also  Users in shock as Instagram Defaults to Limiting Political Content

At times, UNetbootin may appear to pause during the extraction and copying files phase. Exercise patience, as it will eventually complete the operation.

The UNetbootin progress window.
UNetbootin should be able to create your USB drive in under 15 minutes. Screenshot by Jack Wallen/ZDNET

Once the process is complete, click “Exit” to close UNetbootin. Safely eject the USB drive from your computer.

Now, you’re all set. Insert the USB drive into the machine where you intend to install the Linux operating system. Boot up the machine and follow the prompts to begin the installation process. Enjoy exploring your new Linux desktop!

Creating a bootable USB drive offers several advantages:

  1. Portability: A bootable USB drive allows you to carry your operating system with you wherever you go, enabling you to access your preferred Linux distribution on any compatible computer.
  2. Ease of Installation: Installing Linux from a USB drive is often faster and more convenient than traditional installation methods, such as using DVDs or CDs.
  3. Flexibility: With a bootable USB drive, you have the flexibility to try out different Linux distributions without committing to a full installation. This allows you to experiment with various operating systems and find the one that best suits your needs.
  4. Accessibility: Bootable USB drives provide an accessible way to install Linux on computers that lack optical drives, such as ultrabooks and netbooks.
  5. Data Preservation: Unlike installation methods that require formatting the entire hard drive, installing Linux from a USB drive allows you to preserve existing data on your computer’s storage device.

Source: zdnet.com

Please follow and like us: